Wednesday, December 1, 2010

The 10 % Rule; An Acceptible Deviation?

I have preferred to stick to a few set scales, usually 1/32 for figures (sorry; never really got into 1/35), 1/72 for aircraft, 1/144 for spacecraft, etc. The problem arose when a number of older models that fell outside these scales would surface, and inevitably be needed to complete the collection. Whenever that occurred, I would allow for a minor standard for deviations; 10%. This would be both larger and smaller. For instance, when a 1/75 scale Spitfire is sitting near (but not next to) a proper 1/72 model, it looks perfectly fine. It's when the two are brought together that the difference is notable, but that is never the intention.

It is in larger scales that the problem more notably presents itself.

When I was younger, mixing larger scales for armor was very common place. 1/35 scale was just coming into its own, and the Japanese firm of Tamiya was beginning to flood the market. Meanwhile, older models in 1/32 scale were still available, especially with Monogram having made a large number of them (notably their Panzer Mk.IV variants). Most of these kits contained not only armor but figures. Complicating this was Nichimo, which had produced a few kits in 1/30, and likewise some of these kits contained figures.

In due time, it would be relatively easy for a modeller to amass a good many figures. The problem was, of course, that they really varied in size.

Ironically, they still fell within 10% of the median scale, 1/32. A 6' tall human stands 2.25" in 1/32. In 1/35, they stand 2.05", and in 1/30 2.4". In other words, the 2.05" figure would stand 5' 5.6" while the tower over the others at 6' 4.8". Between the extremes is almost a scale foot of difference.

That's not to say that such differences don't occur in nature; they do. But so many other aspects would vary as well; guns, helmets, gear. Ironically, there are actually more figures available in 1/32 (54mm) than in 1/35 (50mm).

The trick is trying to decide how to proceed. Obviously, larger equipment, such as artillery and vehicles, is not so big a deal during play. Even differing scale figures could still be used as long as they were not used together, provided the 10% rule is followed.

Saturday, November 20, 2010

I Rebuild A Cannon (or Britainizing the Barclay)

You might remember my Barclay cannon, which I wrote about on September 26th. 2010 in "The Guns of Late September". It was in bad shape; broken wheel, chip off the front of the barrel.


After a few weeks of consideration, I decided it was time to make the repairs. My approach was to use one of my favorite products, J-B Weld, that wonderful, and one might say legendary, metal filled epoxy. The shield would also be replaced with .010" brass. The results were more than satisfactory, they surprised me.


The wheel was the most challenging part of the repair. I used 3/32" aluminum tubing to shape a new rim, and also used it for the missing spokes. I positioned them initially with CA glue, and then slathered on the J-B Weld, waiting for it to set a little more and then shaping it just a little with a wooden strip. It was laid on an old Testors' Dullcote cap, covered in wax paper, that was punctured to allow the hub to fit through. Interesting note; when the wheels were removed, I discovered that the wheels had been installed the wrong way, and that the hubs were far more detailed. Once the J-B Weld had dried, I sanded and filed the wheels to achieve the proper shape. Not perfect, but better than no repair at all.


The barrel went faster as far as shaping was concerned. I used a 1/8" plastic tube with a piece of wax paper wrapped around inserted into the muzzle. J-B Weld was applied to the missing section, shaped, and once it had dried, it was rather simple to shape.

The shield was initially glued into place with contact cement and CA. However, I desired a more permanent fix, so I used two bolts to attach it.
There was another reason for using the bolts. I wanted to try my hand at a baked enamel finish, and contact adhesive will soften. The next step was to prime the model. I removed the wheels and sprayed the model with Rustoleum gray primer. Once that had set hard, the parts were painted Testors classic Olive Drab, with the tires done in flat black, the breech in silver (all Testors' classic).
To bake the model, the wheels were temporarily mounted on a toothpick axle and raised above the baking surface by some aluminum foil. The rest of the cannon was likewise lifted with a wad of foil, and the whole thing, paint still tacky, was placed in a 200 degree F oven for 30 minutes. Once it had finished (and what a wonderful smell), the model was allowed to cool and be reassembled.
This is the end result -

It looks more like a Britains' cannon now. The finish is very tough. Certainly an improvement over the beat up cannon I purchased.


Tuesday, November 16, 2010

Things To Do With Cheap Plastic Artillery

A few weeks back, I came across four inexpensive field guns online. The price was excellent, working out to $1.75 a piece.


I have no idea who the manufacturer was. There are traces of a manufacturer under the trail; one could almost make out "Italy". Regardless, the field guns are decent enough, and offer plenty of potential. You see, these appear to be plastic copies of the Britain's 25 pounder, right down to the breech.


They aren't perfect, of course. The tires are abysmal, and there is a bit of warping.


Since they are so similar to the Britain's gun, I wondered if it would be possible to not only convert the guns so that they can fire, but if they could be made to look even better, perhaps by replacing the wheels. But they wouldn't be made into 25 pounders. Instead, they would be made up to look like late Great War 18 pounders.


The conversion was very simple. I used the spoked wheels from BMC limbers, and these in turn were mounted on a length of 3/32" aluminum tube, mounted higher up on the carriages. 1/16" plastic washers were used to provide a bushing to keep the wheels in place.


Using a 1/8" drill bit, I opened up the barrel to the breech; it is almost as if they copied not only a Britain's 25, they did a pantograph copy of one with the firing mechanism still in the barrel, because it certainly seems as if it is cast in there. A firing mechanism was made using a paperclip and a spring. Since the trail could detach, the spring was attached to the right trunnion.


It still needs to be painted, and of course there are some minor details. Once this one is finished, the remaining three will be likewise modified. The end result is what matters, and I think these will work out very well. (Note: Edited on 17 November to correct image links. Been doing quite a bit of editing of late, it seems...)


Sunday, November 14, 2010

Motoring Into Battle


I've always wanted a Jeffrey Quad. Strike that; not always. Just for the past few months, once my understanding of the vehicle grew.
And it's not like there aren't a lot of Great War era 1/32 military vehicles. In a word; they are virtually nonexistent. True, there are a few 1/35 armor kits, some resin models, all pricey stuff and most really not suited for play. There are a few 1/32 models available, such as a German A7V and British Mark IV Tadpole, that are specifically designed to be used with 54mm soldiers. There are even a few limited production diecast models as well, that usually require a line of credit to purchase; play is out of the question with these, and I'm afraid I don't have the budget for them.
Where are the FT-17's, the Liberty trucks, and, yes, the Jeffrey Quads?
Which brings me to my model.

This was started in the summer of 2010, more of a test build to see if another craft kit, this time the covered wagon, could be turned into something a bit more usable. I picked up a few to use as limbers, but decided to convert one into a very simple Jeffrey Quad, using mainly the parts from the kit. I got as far as most of the body, which is extremely simplified. The cargo bed is wider than the prototype, but there were so many trucks that were conscripted that differences are to be expected. The wheels, though, were too large, and the replacement wooden wheels I had on hand were too thick.
That didn't work the way I had hoped.
I stopped in August when it was discovered that the plan to use nothing but parts from the kit was a poor one. At the beginning of this week, I decided to change my approach.
New wheels were made from 3/4" craft wheels extended out to 1 1/4" using black-brown scrapbook stock, 3/16" wide strips glued to the circumference to make new tires. The wheels would be turned around, with the flat side facing out. Axles were made from 1/16" dowels, using paper to shim them up to allow the wheels to fit snuggly.
A new frame was made from 1/8" square strip stock. While more detailed leaf springs could have been made, I chose to simplify those as well using 1/8" balsa sheet. 3/16" coffee stirrer wood was used for making axle rails.

The grill was made from scribed cardstock with strips for detail. The single light was made from a 3/16" wooden plug in a yoke made from copper wire. The steering wheel was made from a 1/2" snap that was worked with files to make it appear more accurate. The radiator cap is the head of a brass brad nail.
The canvas cover for the cargo bed was made from the fabric supplied in the kit, as was the wire frame found at the front and back. I designed this so that it can be removed. Coffee stirrer stock was used to reinforce the canvas at its edge. A brass jewelry hook was used for the tow.

Additional wire and wood bits were used to finish the model out, and it was painted with Testors Flat Olive, acrylic black for trim, acrylic gloss black for the steering wheel and seat, and Ceramcoat Timberline Green for the canvas.
It's not 100% accurate, and will certainly not win contests. But for toy soldier play, it is just right.

(Note: edited 15 November to correct some grammatical errors and to add some additional content)

Monday, November 8, 2010

Finally, The 1930's Edition Britain's 4.7" Naval Cannon (Mounted for Field Work)

I monitor the auction and collector's sites in search of items. Not always to buy but to see how the hobby is doing. As a toy soldier enthusiast, I'm sure I'm certainly not alone.
So, imagine my shock when I stumble upon this...


This is W. Britain's product no. 1264, a 1930's edition of the fabled 4.7" Naval Cannon. The price was fantastic, so, of course, I had to grab it Jamie let me insisted I have it. It even came with a bag of rounds (both 4.7 and 6 inch, apparently).
I'll just let the pictures do the talking. Here it is with some of the 4.7" rounds. There are dozens of them.

Here it is with my scratchbuilt de Bange 155mm. They complement each other.

The firing mechanism is somewhat worn; this cannon was well used!


And sadly, this will be the last I see of it. It is technically my Christmas present. Until then, it shall inhabit my dreams as the penultimate ultimate toy cannon (thanks Cort!).
(Note: this article was edited on 15 November to correct grammar)

Wednesday, October 27, 2010

Shaving Plastic Beards, Cropping Plastic Heads


One thing that really disappointments me is the extreme lack (at least in 54mm scale) of two major groups of combattants from the early months of the Great War; French and Belgian soldiers. Now, our friends at HäT make nice French in kepis in 1/72 scale (my preferred scale for fine modeling), but not in 1/32. The only company that makes anything resembling French troops in what could be considered pre-war garb is Armies in Plastic, and they are Foreign Legionnaires. Converting these into 1914 French infantry should be easy, right?

Sadly, wrong.

While most of the figures are excellent, the problem arises with the headgear; modifying the Foreign Legion kepi involves removing the fabric from the back, which almost always runs a considerable length down the back. Once that is removed, you would have to reshape the back of the heads and shoulders. Even something as simple as replacing the head would still require removing the scarf from the back and the shoulders.

There are options, make no mistake, just not easy ones.

When removing material from soft plastic figures, it is important to remember that it is not really forgiving and even seeks revenge by leaving hairs and burrs. It is easier, however, to add material.

This is why I chose to use the older BMC American Civil War soldiers for modeling French. Possibly not the best course of action, but one which makes sense to me.

As my first test proved, simply painting the soldier in French colors made him look decent enough. However, I decided to see if the same pose could be modified even more. I took one of the duplicates and proceeded to remove the top of the ACW kepi and shape a new from Sculpey. Just that modification alone vastly improved the gunner, but before the new kepi was attached, I decided to do some more changes. One of those involved modifying the trousers to look more like they were tucked into boots. That was not as easy as I thought it would be; the plastic that the BMC troops are molded from is a rather hard polyethylene. The next task was to modify the facial hair, which turned out to be a bit easier but still difficult. My soldier would have a mustache and goatee, a Van Dyke, if you will (more than likely an older non-com who was in the reserves and reactivated in August of 1914. So much for the pension, c'est la vie).

The results were pleasing though far from what I would consider show quality. However, for what will be one of my "regulars and reservists", adequate enough.

However, I am looking at not just a few soldiers but dozens that will be modified. It is easy to foresee going through vast numbers of knife blades, however to facilitate the headgear, at least, I have made a Sculpey mold for the basic kepi.

This could have been used to turn out Sculpey (or any other medium) kepis. There are other ways to make kepis as well without resorting to dies. Another method involves rolling out a "snake" of Sculpey to a little less than the correct diameter, flattening it to match the form for the cap, cooling it down in the refrigerator and cutting small lengths to the appropriate height and then baking them until cured. These can be used in a similar method to my first modification, simply cutting off the top of the American kepi.

The best method, however, turned out to be Squadron Green Putty. Basically, enough putty was added to start the kepi, and then while it was still soft, shaped. Once it had set overnight, it was simply a matter of sanding the kepi.

This officer was done that way, and while not quite finished, certainly looks decent enough.

The trouser/boot modification will probably not be used that often, though the facial hair modification will probably need to be (French military standards being what they were). Great coats will be avoided on these soldiers as well.

So this will probably be used for many of the "R & R troops" (regulars and reservists). I have yet to consider how to approach the Belgian troops. Sacre bleu!

Friday, October 22, 2010

Rules

As much as I'd like to, the amount of space we have is not really sufficient for a full blown "little war" a la Wells. However, I don't care much for modern kriegspiel either; the element of play simply is not there, and at times it seems too much like you're a general miles away from the front. While the more modern military wargames using 22mm to 28mm soldiers are popular (indeed, I have a number of 1/76-1/72 scale tanks), the sense of "playing with toy soldiers" is lost.

That said, these are my modifications to Wells' rules, pertaining to my favorite pieces in battle, artillery -

1. All guns will have the ability to fire a small projectile. If they are incapable of firing rounds, a gun simulator will be used, itself being a small portable device that can fire.

2. Rounds will be color coded as to caliber and type, as per the following, (with effective blast radii) -

Red - 3 inch/75 - 77mm/15-18 pounder (3 inch/75mm)

Orange - 4 inch/100 - 105mm/25 pounder (4 inch/100mm)

Yellow - 4.5-4.7 inch/115 - 120mm (5 inch/125mm)

Green - 5 inch/125 - 130mm (6 inch/150mm)

Blue - 6 inch/150 - 170mm (7 inch/175mm)

Black - 8 - 9 inch/200 - 210mm (also covers 40 to 65 pounders) (9 inch/225mm)

3. Each player will be provided with "blast disks" for the appropriate weapons used.

4. Any personnel within the blast radius is considered a casualty

5. Blast disks will be labeled with concentric areas in thirds - Mortal (center), Severe (middle), Stunned (outer).

The rest of the rules pertaining to movement and firing are as per Wells. All rounds will be assumed to be HE; schrapnel/anti-personnel rounds are rather unsportsmanlike. While that may seem ironic, yea even naive (we are, after all, talking war), it is the only way to ensure that the game is kept on somewhat a level playing field.

Which, in and of itself, is also ironic...

Thursday, October 7, 2010

Cannons

Cannons have always fascinated me. While I've always built model airplanes, ships and tanks, I've seldom built artillery. I mean, I have made a few pieces, notable amongst them the classic Hasegawa 1/72 155mm US Army Long Tom (built that model several times, at least thrice). In late 1978, I set out to build a model of the that Long Tom in 1/18 scale, using the Hasegawa kit as a guide. The results weren't really half bad, though I never got past the wheels

Where military artifacts are concerned, cannons are perhaps the most accessible. Many towns throughout the United States and abroad have them on display in parks, along the roadside, maybe at museums, almost always at military bases. And sometimes, they are foreign; for some reason, Connecticut has been gifted with a number of German Great War pieces. As for my current home here in northeast Florida, there appears to be a smattering of American made plus some odd Spanish and possibly one French made piece.

My first acquaintance with cannons were with replica French pieces at the Fort Caroline National Monument, a small replica of the original 16th century settlement. I had only seen cannons from a distance, never up close. They were impressive, imposing to my seven year old mind. A few years later I bought a book by Albert Manucy at the Fort, "Artillery Through the Ages". It was a simple book, not particularly large, more an introduction to the science of the cannon. I wanted so badly to build a model of one afterwards.

My first attempt was a mess. Twelve year old me did not understand modeling techniques as well as he would have liked to.

Flash forward to today. I had not build a cannon since 1978, and suddenly I'm struck with the fever. Oh, such joy, these deadly toys. My first cannon, one of those wooden craft kits, turned out just barely okay. My second cannon, though, the de Bange 155mm, really surprised me, especially when compared with the original craft kit from which it evolved. Once it was completed, I decided to try my hand at an 8-inch Mark I, a cobbled together British beast of early 1916.

But I stopped, thinking to myself, can the original kit be made to resemble anything in 54mm-1/32 scale?

With that in mind, I set out to find a prototype. The closest I came was the British RML 64 pounder 71 CWT, at least for the barrel.

These were rebuilt cannons, repurposed from larger guns. They were really meant as secondary weapons, usually used on second line ships or for sea coast defense. They didn't have anything resembling a normal carriage.

But, if they did, how would it be done?

Which brings us to my model.

The carriage is purely fiction, using all of the components of the kit but built with the improvised carriages used during the Second Boer War in mind. The carriage was built pretty much per the instructions, though detailing was added. I drilled out four holes in the wheels, as equidistant as I could, being as the wheels are not only off center, they are also not quite perfectly circular. These in turn were detailed in a fashion similar to the Percy Scott carriages on the Royal Navy 4.7 inch cannons used during that conflict.

I gussied the barrel up to more resemble the 64 pounder's, though, as typical with these kits, there were problems with the bore (yes, this model will fire). The wraps were made from index card stock, the touchhole being built up from basswood.


The final model looks decent, a bit of early 19th century crossed with late 19th century.

May have been purely fictional, but it looks effective. This was really a rather rushed job, meant to be simply fun more than anything else. I've picked up yet another one of these kits (after checking the bore), thinking about another 64 pounder 71 CWT, this one on a garrison mount.

Sunday, September 26, 2010

Artillery Grumbles

After putting together a very nice looking 155mm field gun, I am embarrassed to discover that this impressive looking cannon actually has mediocre range when compared with some of my other pieces. Compared to my first cannon, which just resurfaced, it's a true weapon. When compared with my Britain's 25/18-pounder, though, it falls short.

To be honest, I was stunned by the range of the little diecast gun. Not only does it throw rounds better than the 155, it does so forcefully. The secret is apparently the spring, which feels much stronger. The problem, though, is that the 25/18 is the wrong period, being more a World War II piece.The same cannot be said of my BMC 18-pounder. It is the correct period, and with its current spring can still out range the 155. Even the ancient Barclay can.

What gives?

Probably a couple of things. First of all, the firing mechanism drags on the inside of the barrel. That means lubrication is needed, probably graphite powder. Secondly is the spring itself, from an ink pen. Might need to acquire a stronger spring for more range.

Couple this to the fact that my first cannon has actually resurfaced. Compared to the 155, it is a bit primitive. Still, it might make a nice fortress cannon. Still have two more of those kits.


I suppose I need to think things through a little more on those. Meantime, work has begun on the 8-inch Mk. I. That should be fun.

The Guns of Late September

Before any conflict begins, during the run-up to the first shots echoing across the countryside, there must be an arms race. So it is with our little conflicts that will take place upon the floor.

Troops are only part of the equation. Since we are choosing early 20th century land warfare as a model, we must have the weapon of choice for that period, and that would be artillery. At this time, one working cannon has been built, another earlier attempt has gone missing, and another is in the planning stages with a few parts made.

That's not to say that there isn't artillery in the collection, for truth be told I have a decent start on lighter artillery.

The first weapons acquired were from my good friend Doug, basically surplus pieces from his huge collection. Foremost among these is a plastic British 18-pounder, possibly from Atlantic but currently from BMC.


It looks decent enough, except for those wheels; They're simply dreadful. They look like plastic bottle caps with spokes carved out of them. On the upside, though, is the fact that it's springloaded and capable of lobbing a small round eight or so feet. The newer ones are not so equipped, but little doubt that this is an easy fix. The wheels are best replaced, and indeed that is the plan.

Doug also gave me a number of diecast "pencil sharpener" cannons, and the one amongst these that works looks like either a Whitworth or Armstrong gun, 12-pounder size.


The spring is a real beast in this gun. It takes a bit of pull, but the result is yet another weapon capable of eight or so foot range. Aside from the colors, it looks quite handsome, right down to the 14 spoke wheels.

A short time after acquiring those, I managed to find a Britain's 25-pounder online.


Many places refer to this as a 25, even Britains labeled it thus. However, it looks more like a later 18-pounder, the ones made between the wars. Its paint is chipping, it is a bit stiff, due in no small part to the dirt it has acquired from years of play. Unfortunately, it is also a bit too modern.

Then there is a very beat up Barclay.


This was an eBay purchase. It looks sad, and one has to wonder what sort of stories it could tell. One wheel is broken, the barrel has a piece knocked off the muzzle and the shield is misisng the entire upper half. But the spring was intact, and a little work got it to move freely again. There is quite a bit of work needed here. Since its collectors value is in the tank, I'm going to make changes to it. Not quite sure how I'm going to tackle the wheel, but the shield will surely be replaced, the muzzle repaired, and ultimately the gun repainted. It appears to be based on the M1906 4.7" field gun, which will serve as the prototype for the repairs.

There are more guns as well in my collection, namely cheap little cannons from BMC.


I'm sure one of these is destined for something. But they can't fire, something I'm sure I might be to address.

We'll see.

Sunday, September 19, 2010

Bring In The Artillery!

I love big guns. Be they the classic medieval lombards or World War II era howitzers, I'm pretty fascinated by them. My favorite guns are Great War era, or just slightly before.
You know, the ones the model and toy companies ignore.
That's not to say that they aren't out there. Britains made a number of lovely weapons before the start of the Great War, and these remained in production a rather long time. But when cheap plastic models began to be produced in earnest, most of the pre-World War II guns were basically ignored for the new. Even Britains phased out their older guns.
And of course, this is the era I chose.
I did manage to land a few weapons. BMC makes what appears to be a knock off of an earlier Atlantic piece, which in turn is a plastic copy of a Britains original; an 18 pounder howitzer. My friend Doug surplussed it to me. Making this piece into one that can fire is easy, and in fact the earlier Atlantic piece could. The wheels, however, are atrocious and best replaced.
Another weapon I manage to acquire was an ancient Barclay field gun that also happens to be spring loaded. It appears to represent something like a 75mm. But this model was had for a song because I was somewhat damaged. It will be repaired.
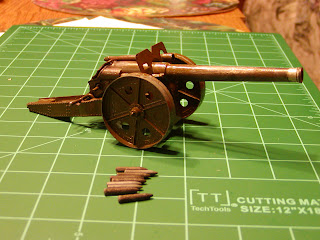
Doug also gave me pencil sharpener that is also a cannon. This looks like a Parrott gun of the Civil War era. It too can fire.
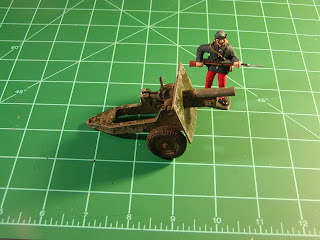
Finally, I managed to find a Britains howitzer, apparently a World War II era 18 pounder. It fires, but looks very rough, as if someone played with it on the beach.
What is really needed, though, are bigger guns, heavy artillery, capable of lobbing rounds across the room. None of those can. I decided to set out and build one.
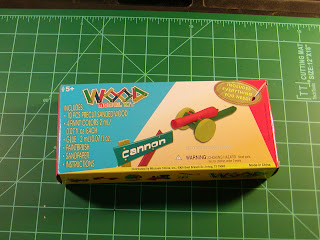
My first attempt was based on a wooden toy cannon from Michael's Arts & Crafts. For the princely sum of $1, you get this...


Admittedly, not a great looking item, but certainly loaded with possibility. So, I picked up four of them. The first one that was built taught me a few lessons, namely that 1.) the bores on these things are hardly ever centered and 2.) Chinese pine is hard and soft in turns. The firing mechanism was made from springs from the hardware store and various bits. Did it work? It did, but not great.
And then it vanished. No idea where it is.
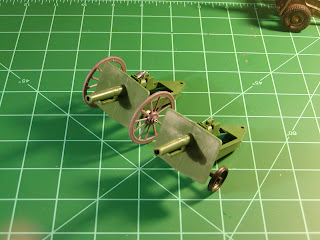
So, around the 7th of September, I decided to make another cannon using the parts from one of the kits. I chose to model the famous French de Bange 155mm Model 1877 as it might have appeared in early 1914. References abound to this gun, but mine is more of an approximation, a fun scale model if you would. It would be designed from the start to fire.
The barrel is ordinary printer paper that was wound around a 3/16" dowel and cemented with a glue stick. Separate layers were used for the breech end, even producing a graceful taper. The trail was widened from 3/8" to 1/2" inch with basswood sides. These in turn were covered with additional basswood sides that were laminated with a cardstock "skin", which had rivets embossed using a pouncing wheel.
I had planned on using the kits wheels, the goal being to make them look like the solid ones that were coming into use. However, I managed to locate a wooden kit wagon that had better looking wheels.
Additional details were made with wire, small dowels and cardstock strips. Once I was satisfied with the appearance, I made a firing mechanism from a retractable ink pen spring, a 1/2" length of 3/16" doweling and a straightened out paper clip. This was cranked in such a way that the cannon can effectively be cocked and loaded. Firing is done by pushing the paper clip wire down, and with a snap, your round is flung twelve or so feet. The wheels were glued directly to the slightly shortened axle with 3/8" wooden plugs added to the outside to represent hubs. The steel tires were made from cardstock.
The basic model was assembled, though I basically jumped the gun and added an aluminum trunnion before the additional barrel details were added. This meant I mounted the barrel to the carriage a bit too soon, and was afraid to undo the work. Also, the elevation mechanism is still being worked.
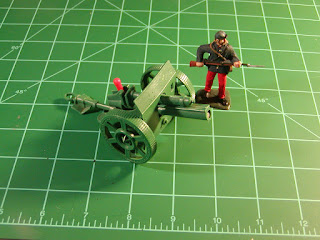
Nonetheless, I pressed on and completed the model. I primed it with a heavy coat of automotive primer, and then sanded many of the details smooth. I then painted the carriage dark olive green, the wheels yellow ochre with tan hubs and brushed steel tires. The barrel was painted flat black, and then painted with a wash of silver acrylic paint for a gunmetal look. The final detail, elevation wheels, were created from black 1/2" snaps.
I think it looks nice enough.

With that finished, time to move on to the next piece... whatever that may be.

Wednesday, September 15, 2010

Building a Small Army

I really enjoy the uniforms of the early 20th century. You had none of this camouflage, which just looks, I don't know... overdone. Effective, yes, but overdone. When the first guns of August 1914 echoed across the frontier in western Europe, the French marched into battle with uniforms that looked similar to those of the American Union Army of the US Civil War; the fact is both the North and the South's uniforms were based on French designs. Interestingly, there are not too many French troops available.
There are period soldiers available, though. Armies in Plastic makes a series of World War I soldiers, as well as late 19th - early 20th century troops as well. These easily lend themselves to the combat being planned. But, many of these soldiers have helmets, and for the early phases of the war are out of place (to my knowledge, only the Kaiser's armies had helmets, possibly the Italians as well). The other Allied armies didn't start wearing the steel helmets until a year or so into combat (though the Brits may have obtained them earlier). If one wishes to model earlier troops, say French infantry wearing kepis, there's some customizing that needs to be done. If you need plenty of them, you may need to make compromises. Which brings us to BMC's inexpensive Civil War soldiers.
For many of the troops, just a simple paint job is enough to make them look "French" (and for the vast majority of them, this will be the route I take). However, there are some anachronisms that will need to be addressed to make them look more accurate, if even a little.
The first is the cap itself. Both the Union and the Confederacy used hats that were based on the French kepi, as were the uniforms in general. The French kepi, though, was generally stiffer than its American cousin and more often stood up. As time and battles went on, the kepi may have deflated somewhat, resembling more the American hat. Making a more French kepi would probably involve cutting off the hat above the brim and replacing the cap with one made from Sculpey or FIMO, or even epoxy putty. If you need plenty of them, you may be able to make a simple mould for the task.
Another problem is footwear. The French wore either boots or ankle boots and wrappings. Either way, the trousers were tucked into them. The BMC Civil War troops have the trousers hanging over the boots (which, I might add, looks rather sloppy). This is probably left up to the modeler's discretion; I might modify a few, but not many.
The last problem has to do with facial hair.
The beards that were common on American soldiers during the Civil War just weren't common on French and Belgian soldiers of the opening months of the Great War. Some probably had them, but they were probably the exception, not the rule. Most, if not all, of the BMC soldiers have them. Discretion again; you could end up trimming them off for days. Perhaps it would be better to keep some beards.
I've already finished one soldier.

He came out adequately enough.
I didn't bother trimming the mould seams and left the ejection pin marks. My manner of painting this soldier was experimental. Rather than using a spray primer or PVA glue (which is a popular method for softplastic figures), I used craft store acrylic satin varnish. This gave a little more bite to the acrylic paint to follow. After the colors dried hard, I sealed the figure with Testors' DullCote. Once that had dried, I painted over the black "leather" with satin varnish to give it a slight sheen.
I'm pretty pleased with the effort. I've not done a 1/32 - 54mm scale soldier in years, and this was really meant to be a fun project. And, to be honest, it was.